5 Web Architecture and Protocols
- Describe the client-server model and trace the sequence of operations from URL to rendered page
- Use browser developer tools to examine page structure, HTTP requests, and response headers
- Explain the roles of TCP/IP, DNS, and HTTP in web communication
- Construct HTTP requests with custom headers using
requestsand parse URL components withurllib.parse - Make an API call and convert the response to a time series visualization
Run this chapter’s code as you read: open the companion notebook (see Appendix A for all of them).
5.1 What Happens When You Load a Web Page?
When you type a URL into your browser and press Enter, a long sequence of operations completes in milliseconds. Your browser resolves the domain name to an IP address, opens a connection to a remote server, sends a request formatted in a specific protocol, receives a response, and renders the result on your screen. Understanding this sequence transforms web data collection from magic into engineering.
This chapter walks through each layer of the stack: the client-server model that structures the conversation, TCP/IP that transports the data, DNS that resolves names to addresses, HTTP that structures requests and responses, and URLs that identify what you are asking for. You will use browser developer tools to observe this machinery in action, then use Python libraries to replicate what your browser does programmatically.
5.2 The Client-Server Model
The web follows a client-server architecture. A client (your browser, your Python script) sends a request to a server (a computer hosting a website or API). The server processes the request and sends back a response. This request-response cycle is the fundamental unit of web communication, and every scraping and API operation you perform in this book is an instance of it.
Your browser is a sophisticated client that handles many things automatically — resolving domain names, managing cookies (including the one that keeps you logged in to a site, which Chapter 8 treats like a password), rendering HTML and CSS, executing JavaScript. When you use requests.get() in Python, you are acting as a much simpler client that only handles the HTTP layer. Understanding what your browser does behind the scenes will help you diagnose problems when your Python client gets different results than your browser.
5.3 Browser Developer Tools
Before writing code to scrape a page, you should always inspect it manually using your browser’s developer tools. Every modern browser includes these tools:
- Windows/Linux: Ctrl + Shift + I or F12
- Mac: ⌘ + ⌥ + I
5.3.1 The Inspector Tab
The Inspector shows the HTML structure of the page as a tree, and it is the tool you will use most in this book. Chrome and Safari call this panel Elements; Firefox calls it Inspector. Whatever the name, the fastest way to open it on any specific piece of a page is to right-click the thing you care about — a headline, a table cell, an image — and choose Inspect (Chrome, Firefox) or Inspect Element (Safari). This jumps straight to that element in the tree (Figure 5.1), rather than dropping you at the top of a page that might be thousands of lines long.
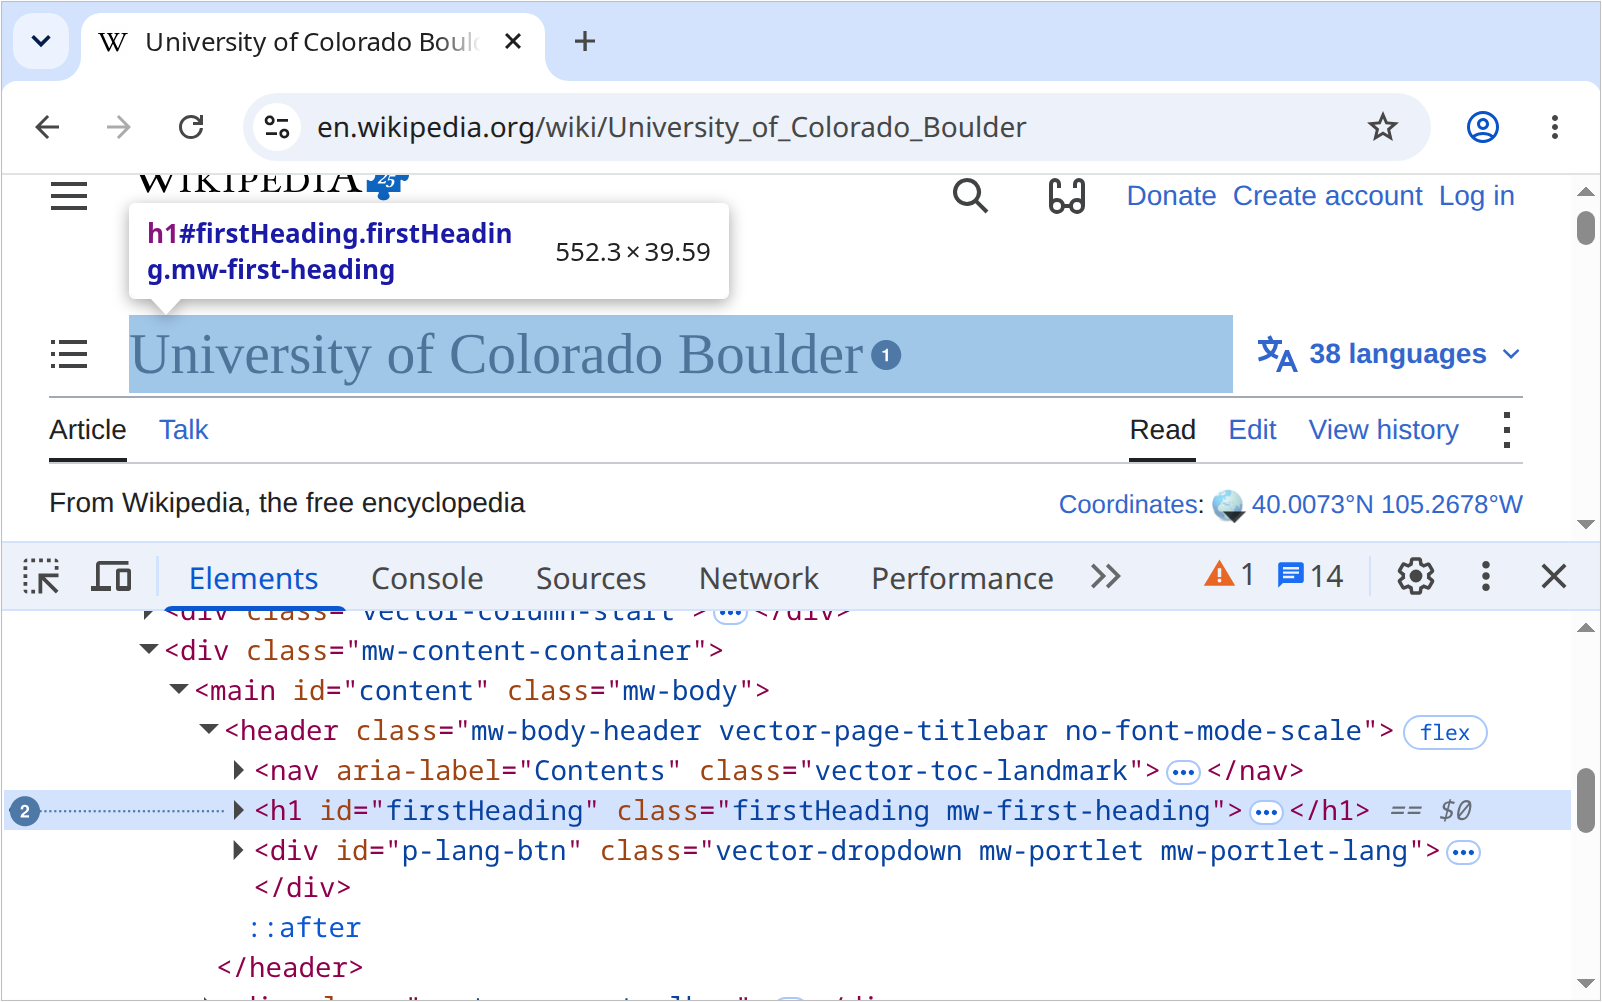
id, classes, and size.
What you are looking at is not the page’s original HTML — it is the DOM (Document Object Model), the browser’s live, in-memory representation of the page after JavaScript has finished modifying it. View Source — usually reached from the page’s right-click menu or the browser’s main menu — shows the original bytes the server sent; the Inspector shows what the page looks like right now, which on a JavaScript-heavy site can be substantially different. If an element is visible in the Inspector but missing from View Source or from requests.get(url).text, JavaScript put it there after the page loaded, and requests alone will never see it (you will meet the tools for that case in Chapter 8).
Hover over any node in the tree and the browser highlights the corresponding region of the page — a fast way to confirm you have the right element before you write a selector for it. The reverse direction works too: click the small arrow-and-box icon in the DevTools toolbar (the element picker, sometimes called inspect mode; Figure 5.2), then click anywhere on the rendered page, and the Inspector jumps to that element’s node in the tree. This is usually faster than hunting through nested <div>s by eye, especially on a complex page.
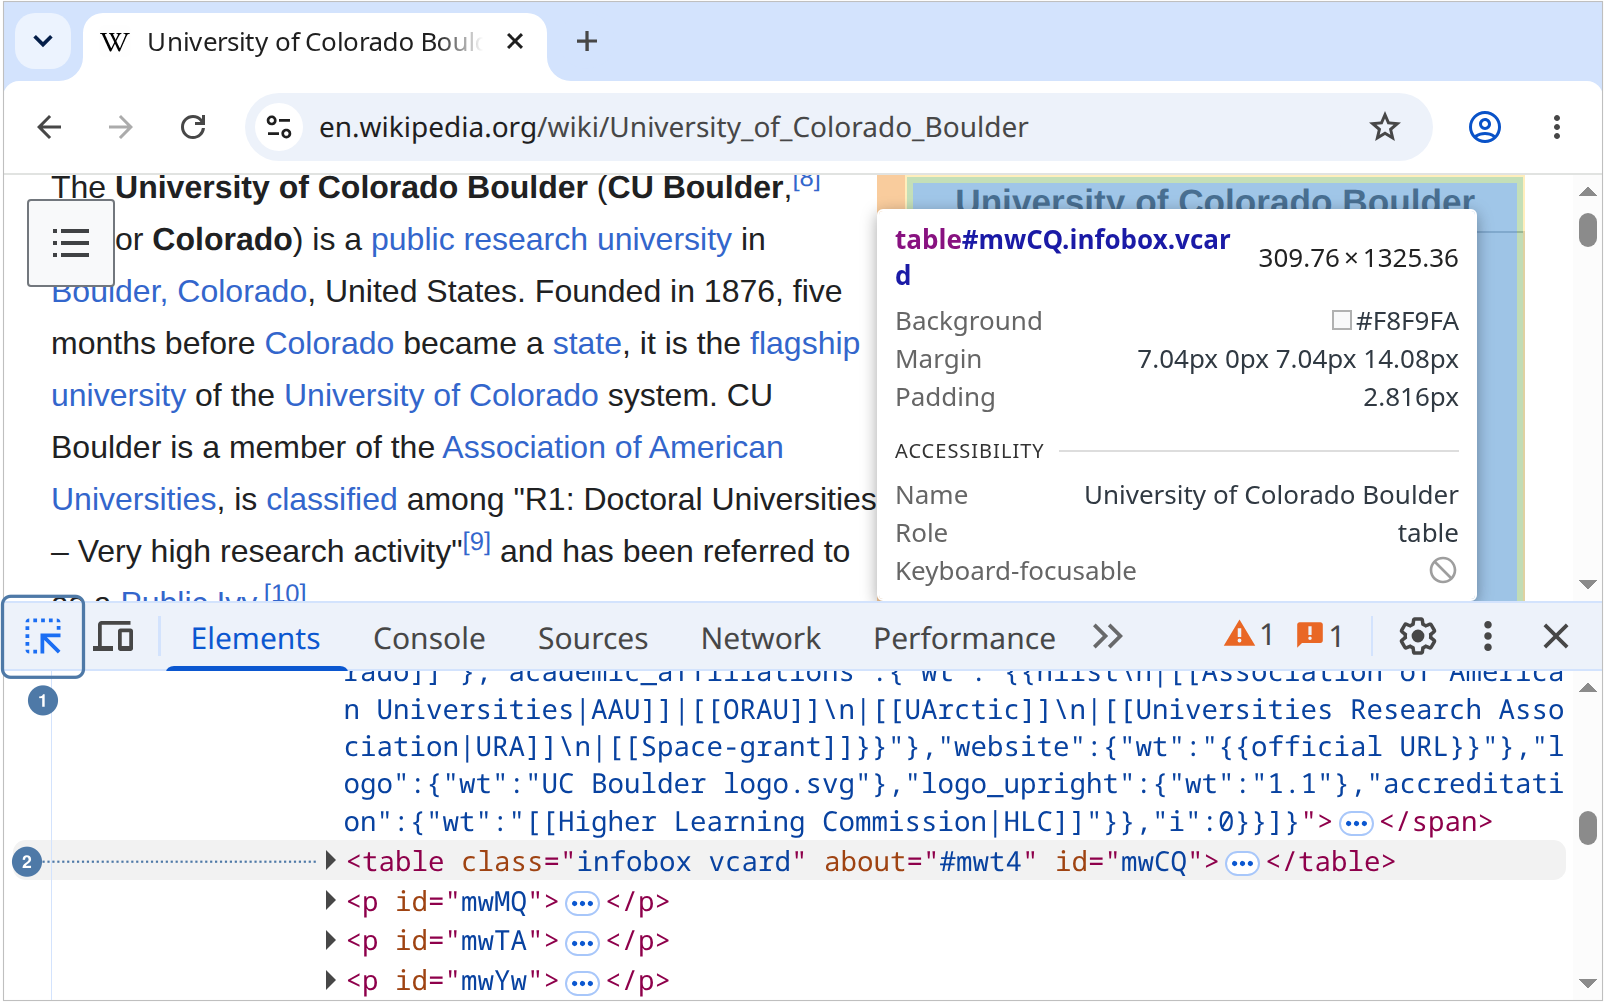
id, classes, and size, and highlights its node in the Elements tree ②. A click selects that node.
Once you have the right node selected, look at its attributes — id, class, and any data-* attributes are usually your most reliable scraping targets, since class names built for styling can change with a redesign while ids and data-* attributes more often encode stable, semantic meaning. Right-click the node itself (not the page) for a Copy submenu with Copy selector and Copy XPath. Each describes exactly that element, in a different language. For the article’s title, Copy selector gives the CSS selector #firstHeading, which you can paste straight into a soup.select() call as a starting point. Copy XPath gives //*[@id="firstHeading"], an XPath expression, and BeautifulSoup doesn’t read XPath: pasted into select(), it raises SelectorSyntaxError: Invalid character '/' position 0. Keep XPath for tools that accept it, such as Selenium’s By.XPATH (Chapter 8) and the lxml library’s .xpath(). For an element without an id of its own, both copies come out longer and more brittle than necessary, tied to a specific nesting depth rather than a stable class or id, so simplify them before you rely on them.
You can also edit the DOM directly in the Inspector — double-click any text node or attribute to change it. These edits are temporary and local to your browser tab; reloading the page discards them, and no one else sees them. This makes the Inspector a safe place to experiment: delete an overlay or a cookie-consent banner that is blocking your view of the content underneath, or temporarily strip an element’s styling to see the plain structure beneath it. Nothing you do here reaches the server.
Start with a simple, mostly-static page like a Wikipedia article before trying a commercial site — most commercial sites are full of tracking scripts, ad-injection code, and dynamically generated markup that obscures the structure you are trying to learn to read. Once you are comfortable navigating a simple page’s tree, a complicated one is just more of the same skill.
For more detail than this book covers, see each browser’s own documentation: Chrome DevTools — Elements panel, Firefox DevTools — Page Inspector, and Safari — Web Inspector.
5.3.2 The Network Tab
The Network tab lives alongside the Inspector in the same DevTools window — Chrome, Firefox, and Safari all call it Network. Open DevTools first (the shortcuts above, or right-click anywhere on the page and choose Inspect / Inspect Element, which opens the whole DevTools panel), then click the Network tab specifically. Reload the page while it is open — the Network tab only records requests that happen while it is visible, so a page you already loaded before opening DevTools will show nothing until you reload it. Check Keep log (Preserve log in older versions of Chrome) if you want the list to survive a redirect or a full page navigation instead of clearing itself; this matters when you are tracing a login flow or a multi-step redirect chain.
A single page load typically produces dozens or hundreds of requests — not just for the HTML document, but for CSS stylesheets, JavaScript files, images, web fonts, and tracking or advertising pixels. The filter bar near the top narrows this down by resource type: Doc shows the main HTML page itself; Fetch/XHR shows requests JavaScript made after the page loaded, which is where API calls and dynamically-loaded data almost always appear; JS, CSS, Img, and Font show exactly what they say. When a page’s actual data is not present in the initial HTML — a common pattern on modern, JavaScript-rendered sites — the Fetch/XHR filter is usually where you find the real, structured (often JSON) request that a Python scraper should replicate directly, instead of trying to parse rendered HTML at all (Chapter 8 covers this in depth).
Each row in the request list shows several columns at a glance: the request’s Name (usually the URL’s last path segment), its Status code, its Type, its Size, and its Time — how long that request took. The Waterfall column visualizes timing as a colored bar: a queuing delay, DNS lookup, connection setup, waiting for the server’s first byte (often labeled TTFB, time-to-first-byte), and content download each get their own segment, so a request that is slow because the server is slow to respond looks visibly different from one that is slow because the response itself is simply large. Recent versions of Chrome hide the Waterfall column and draw a similar timeline above the list instead; to add the column, right-click any column heading and choose Waterfall (Figure 5.3).
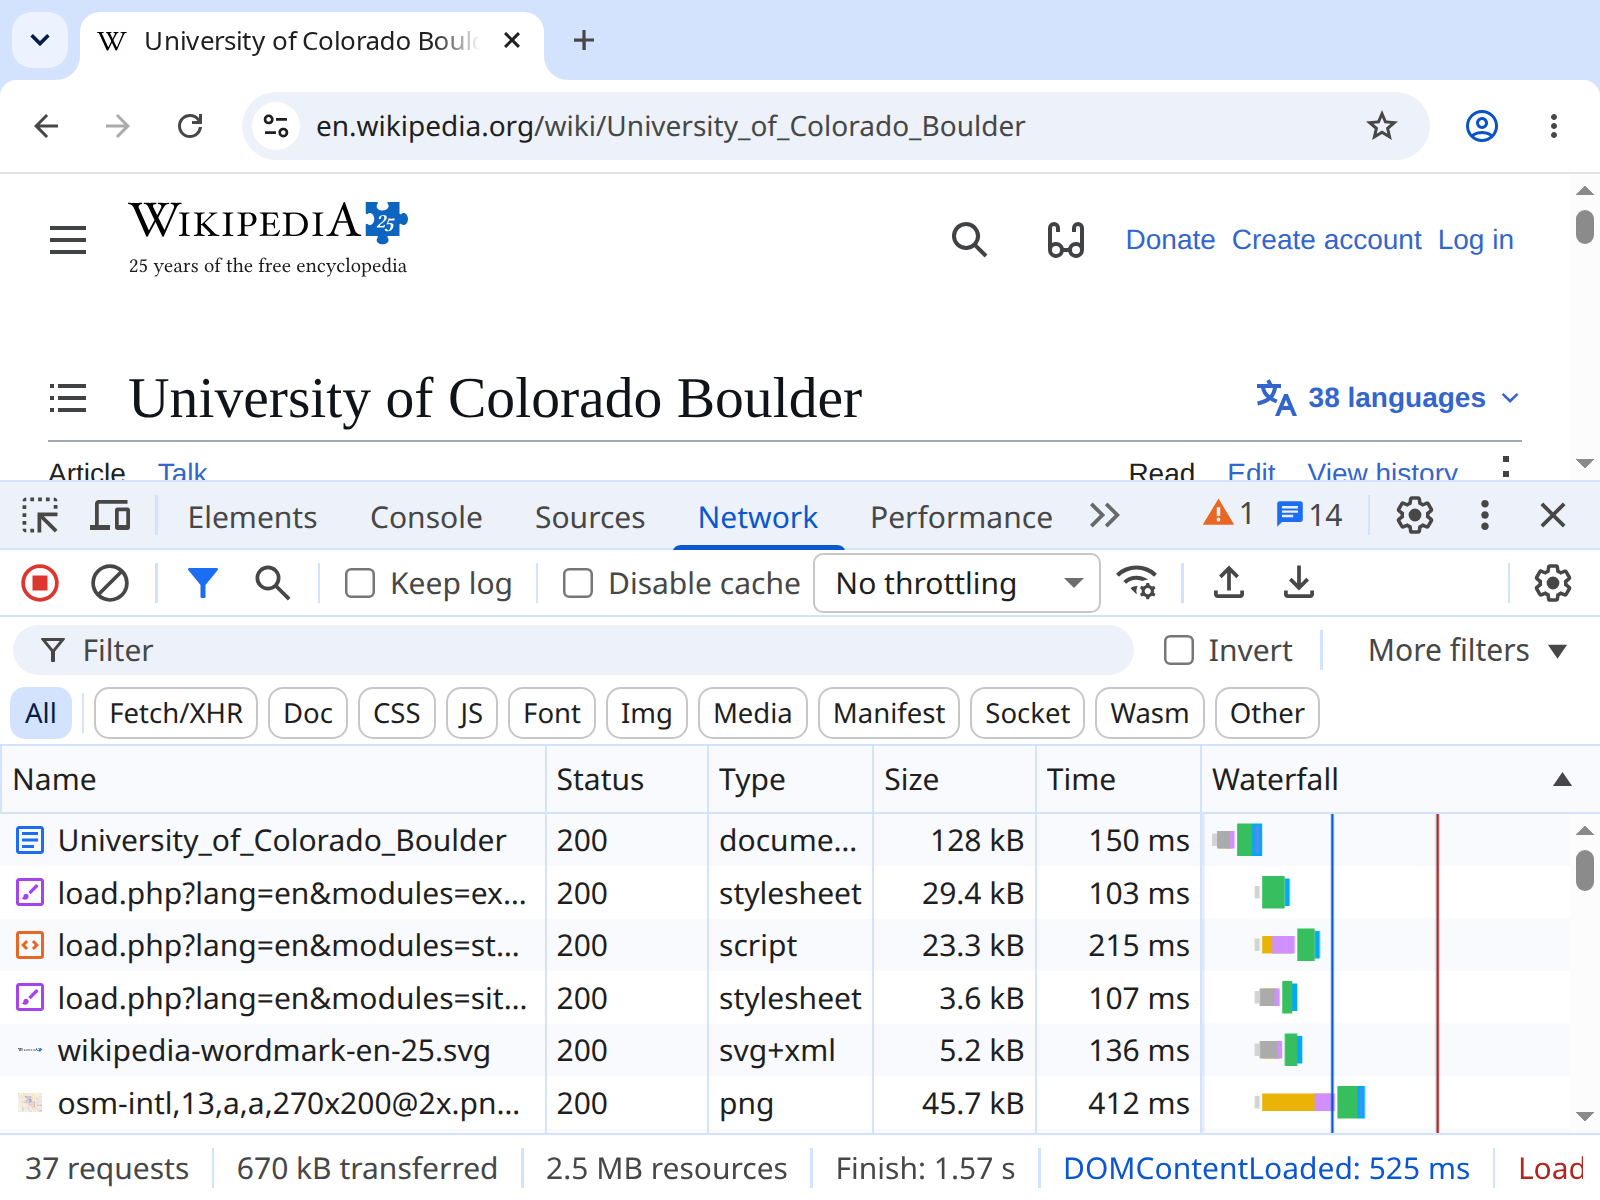
(memory cache) or (disk cache). Here the Waterfall column is switched on, and the Initiator column and the timeline Chrome normally draws above the list are hidden.
Click any individual request to open a detail pane with several sub-tabs (Figure 5.4). Headers shows the request headers your browser sent (including User-Agent, Accept, and any Cookie header carrying session information) and the response headers the server sent back (including Content-Type, Set-Cookie, and caching directives). Response (Chrome/Safari) or the equivalent pane in Firefox shows the actual response body — for a Fetch/XHR request, this is usually where you confirm the exact JSON shape you will need to parse in Python, before writing a single line of code. Timing breaks the waterfall segments down into exact millisecond values.
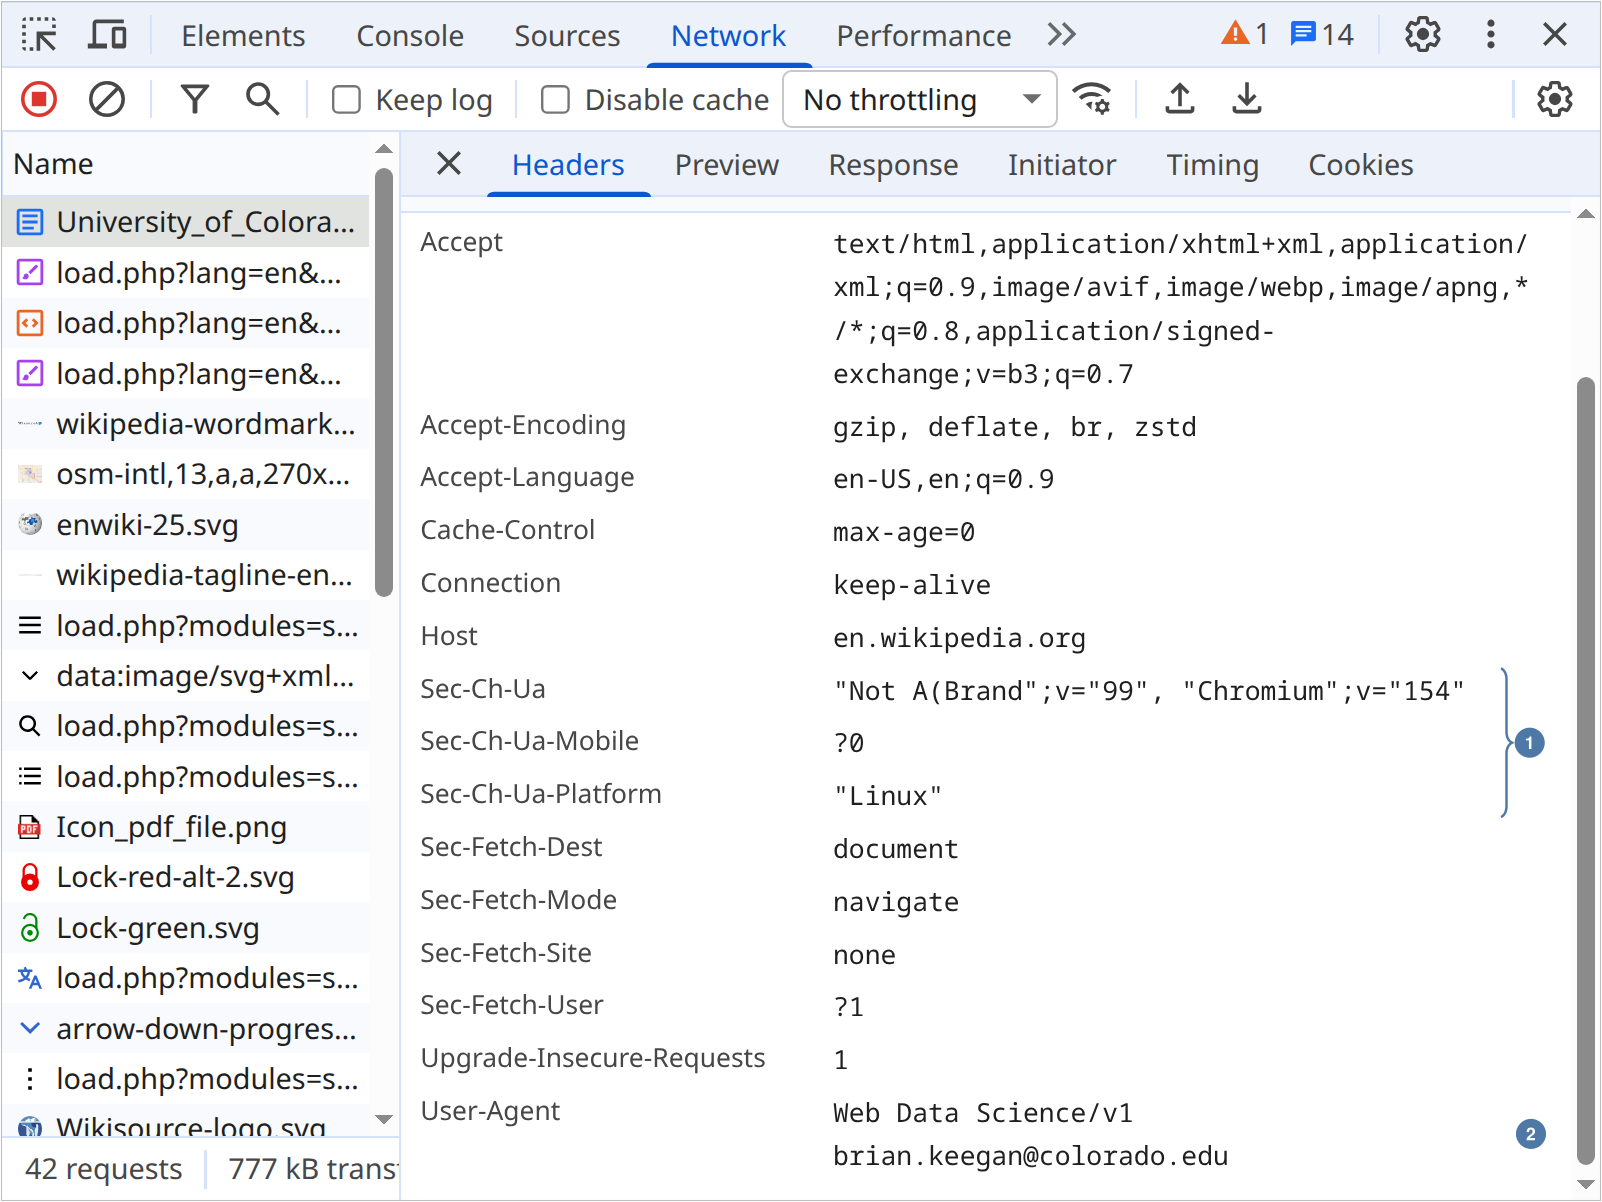
Sec-Ch-Ua rows ① are User-Agent Client Hints, reporting Chromium 154 on Linux; User-Agent ② is the identification this book’s screenshots are taken with, where your browser would send a long Mozilla/5.0 … string. This capture used HTTP/1.1, through a proxy; over HTTP/2, header names are lowercase and :authority stands in for Host.
One feature is worth learning early: right-click any request and look for Copy → Copy as cURL. This gives you a complete command reproducing exactly what your browser sent — method, headers, cookies, and body — which is often the fastest way to figure out which headers a requests call needs to match a working browser request. Read the copied command directly, or paste it into a cURL-to-Python converter; the header names and values map onto the headers= dictionary you already know how to pass to requests.get().
Pay particular attention to the User-Agent header on outgoing requests — how your browser identifies itself, and a value you can deliberately change yourself, covered in “User-Agent Spoofing” later in this chapter — and to Cookie headers on both sides, since session-based sites use them to recognize you across requests.
For more detail, see: Chrome DevTools — Network panel, Firefox DevTools — Network Monitor, and Safari — Web Inspector.
For a broader introduction to how HTTP and web APIs work, see Missing Manual Chapter 24: HTTP and Web APIs.
5.4 TCP/IP: The Transport Layer
Every computer on a public network has an IP address — a numerical identifier that functions like a postal address. IPv4 addresses are formatted as four numbers separated by dots (e.g., 151.101.130.133), allowing for about 4.3 billion unique addresses. IPv6 uses a longer hexadecimal format to support a vastly larger address space.
You can find your own computer’s IP address programmatically:
Be aware that on many Linux and macOS systems this lookup returns a loopback address like 127.0.0.1 or 127.0.1.1 — an address that simply means “this machine” — rather than your network-assigned IP, so the public-IP query below is the more reliable way to see how the internet identifies you.
To see your public IP address (as seen by servers on the internet), you can query an external service:
From the terminal, inside the notebook. Some of the most useful network tools are programs that come with your operating system rather than Python libraries: ping, traceroute, and curl. A notebook can run them too. When a line in a code cell starts with !, Jupyter hands the rest of the line to your computer’s terminal, and the program’s output appears under the cell. There is nothing to install, and no administrator rights are needed.
The fastest reachability check is ping, which sends a few small packets to a host and reports whether, and how quickly, it replies:
No reply after four tries usually means the host is unreachable, or that a firewall is silently dropping the probes — the same ambiguity traceroute’s * * * runs into below.
5.4.1 Traceroute
When you send a request to a remote server, the data does not travel in a straight line. It hops through a series of intermediate routers, and tracing that path is a good way to make the abstract idea of “the network” concrete. Every major operating system ships a tool that traces it: traceroute on macOS and Linux, and tracert on Windows.
It can take a minute, because the tool waits a few seconds for each router that doesn’t answer. On Linux, if traceroute isn’t installed, !tracepath en.wikipedia.org does the same job.
To work with the output in Python instead of reading it, put a variable in front of the !: hops = !traceroute -m 20 en.wikipedia.org stores each line of the output as one item of hops, which you can loop over like a list. Each hop represents a router or server along the path. You can use an IP geolocation service to map these hops geographically:
import requests

def geolocate_ip(ip):
    """Look up the geographic location of an IP address."""
    response = requests.get(f"http://ip-api.com/json/{ip}")
    return response.json()

# Note: ip-api.com limits you to 45 requests per minute
location = geolocate_ip("151.101.130.133")
print(f"{location['city']}, {location['country']}")
5.4.1.1 Interpreting Traceroute Output
Each line traceroute prints represents one hop — a router along the path — with its IP address (or hostname, if one resolves) and a round-trip time in milliseconds. A few patterns come up often enough to be worth recognizing on sight:
* * *, or an unanswered hop. Not every router replies to traceroute probes — many are configured to rate-limit or silently drop them for their own protection. This does not mean that hop or the connection is broken; it usually means the path continues fine past it, just without a visible line for that one router.- A sudden jump in round-trip time. A hop dramatically slower than the ones just before and after it often marks a long-haul or undersea link — the path crossing from one continent or region to another — rather than anything being wrong.
- Private IP addresses in the earliest hops. Addresses starting with
10.,192.168., or172.16.–172.31.are private, non-routable addresses reserved for local networks. Seeing them in the first hop or two is normal: it is your own home or campus network’s internal routing, before your traffic ever reaches the public internet. - Hostnames that encode geography. Router hostnames on the public internet often contain airport codes or city abbreviations from the network operator that owns them (
iadfor the Washington, D.C. area,ordfor Chicago, and so on) — a quick, informal way to guess where a hop physically sits, well before you bother calling a geolocation API on it. - Round-trip time stabilizing near the end. The last few hops usually settle close to the actual latency you would measure with a simple ping to the destination — a sign you have essentially arrived, even if the exact last hop does not respond.
5.4.2 Packets
Every message this chapter has described — a DNS lookup, an HTTP request, a traceroute probe — ultimately travels as a sequence of packets: small chunks of data, each wrapped in its own headers that carry routing and delivery information separately from whatever payload it carries. TCP breaks a message into packets on the way out and reassembles them in order on the way in; that reassembly is exactly what lets requests hand you back one clean Response object instead of a pile of disconnected fragments.
Packet sniffing means capturing these packets as they pass across a network interface, rather than only sending and receiving your own application’s requests the normal way. This is a meaningfully more invasive capability than anything else in this chapter. A traceroute or a DNS lookup only ever touches traffic you generated. A packet sniffer running on a shared network — campus wifi, a coffee-shop hotspot, an office LAN — can, depending on the network’s configuration, see other people’s traffic too: which sites they are visiting, and on an unencrypted connection, potentially some of what they are sending. Capturing your own traffic on your own machine is unambiguously fine. Capturing other people’s traffic without their knowledge or consent is a real privacy question, and sometimes a legal one — Chapter 2 covers consent and authorized access in more depth, and it applies here as much as it does to scraping.
This book doesn’t have you sniff packets. Capturing them takes administrator rights on every major operating system, because of what it would let any program see, and running a notebook with those rights is a habit not worth building.
You can still watch one connection pass through the layers from your own side of it. curl, a command-line HTTP client that comes with macOS, Linux, and Windows 10 and later, narrates what it does when you add -v (verbose). The section on curl and wget below covers it in full.
Read the output from the top:
- Lines starting with
*are curl’s notes on what it is doing. The first ones show the name resolved to an address, thenConnected to en.wikipedia.org (…) port 443. By that line, TCP’s handshake is done: aSYNfrom your machine proposing a connection, aSYN-ACKfrom the server accepting it, and anACKconfirming, all before a single byte of HTTP. Those three packets happen inside your operating system, below any program you run, which is why curl reports that they finished rather than showing them. - The
*lines that follow are the TLS handshake, which encrypts the connection for HTTPS: you will see the TLS version and which HTTP version the server accepted. - Lines starting with
>are the request curl sent: the method and path,Host, and yourUser-Agent. - Lines starting with
<are the response: the status line and headers, the same ones the Network tab showed you.
Every request this chapter makes with requests.get() goes through the same stages. The Network tab’s Timing view breaks one request into them too: DNS lookup, initial connection, SSL, and waiting for the first byte. To see the packets themselves, Wireshark is the standard packet analyzer. Installing its capture driver needs administrator rights, so use it only on a computer you own, and only on your own traffic.
5.5 DNS: The Address Book
The Domain Name System translates human-readable domain names (like en.wikipedia.org) into IP addresses that computers can route to. You can perform DNS lookups programmatically with the dnspython library:
From the terminal. The same lookup, without Python:
dig en.wikipedia.org(macOS and Linux; on Windows, or anywhere dig is not installed, nslookup en.wikipedia.org asks the same question.) An “A” record, short for address record, is the type of DNS record that gives a domain’s IP address. A records hold only IPv4 addresses, so finding one also tells you the domain has an IPv4 address. Both return the same A record dns.resolver gave you, plus detail the Python call does not surface by default: which DNS server answered, and how long the result is cached for — its TTL, in seconds.
Domain names have a hierarchical structure: subdomain.domain.top-level-domain. Each top-level domain (.com, .org, .edu) is operated by a registry organization — Verisign runs .com, for example — under the coordination of ICANN, the nonprofit that oversees the internet’s naming system. The domain (wikipedia) is registered by the organization. Subdomains (en, es, m) are controlled by the domain owner and do not require separate registration.
5.5.1 The Structure of Domain Names
Understanding this hierarchy helps you navigate the web programmatically. Consider a few examples:
en.wikipedia.org— The TLD is.org(a generic TLD for organizations). The domain iswikipedia(registered by the Wikimedia Foundation). The subdomainenindicates the English-language edition. Other subdomains likees,de, orm(mobile) are all controlled by Wikipedia and do not require separate registration. The pageviews API you will use later in this chapter lives atwikimedia.org— not a subdomain ofwikipedia.orgbut a separate registered domain that the Wikimedia Foundation also operates.api.census.gov— The TLD is.gov(restricted to U.S. government entities). The domain iscensus. The subdomainapiindicates this is the programmatic access point rather than the public-facing website atwww.census.gov.cuinfoscience.github.io— the domain this very book is published under. The TLD is.io, officially the country code for the British Indian Ocean Territory — but almost no one using a.iodomain has any connection to that territory. Developers read “io” as shorthand for input/output, and the tech industry adopted it for that association alone; GitHub Pages uses it as the default domain for every project site it hosts, this one included.www.bbc.co.uk— the United Kingdom splits by second-level domain rather than by TLD the way the U.S. does. Commercial UK sites conventionally sit under.co.uk; UK government sites use.gov.uk, and UK universities use.ac.uk— three purposes the U.S. gives entirely separate top-level domains (.com,.gov,.edu), folded here into one ccTLD,.uk, with the purpose distinguished by what comes before it.
From the terminal. whois answers a related but different question than DNS does — not where a domain points, but who registered it and when:
whois wikipedia.orgThe exact fields vary by registrar, but the output typically includes the registrar’s name, the registration and expiration dates, and — increasingly rarely, since privacy services now redact most of it — the registrant’s contact information.
Most of this chapter’s examples end in .org, .gov, or .edu — generic TLDs with no country attached, because U.S. institutions built the early internet and defaulted to them. That produces a U.S.-centered blind spot worth naming directly: the United States has its own country-code TLD, .us, and almost nobody uses it — roughly three-quarters of the most-visited websites registered in the U.S. use .com instead. Most other countries went the opposite way. In Germany, .de is the dominant choice for German websites, used far more often than .com; the same pattern holds across much of Europe, Latin America, and Asia, where a country’s own ccTLD is the unmarked, default choice — not a special-purpose alternative the way .us is in its own home country.
Two further wrinkles are worth recognizing when you encounter them:
- Repurposed ccTLDs. Some country codes get adopted for what their letters happen to spell rather than for any connection to the country they were assigned to —
.ioabove is one..ai(Anguilla) has become the default TLD for AI companies, and.tv(Tuvalu) was an early favorite of streaming and broadcast sites for the obvious reason. None of this changes how DNS resolves them; they are ordinary ccTLDs, functioning exactly like any other. It does mean you cannot infer a site’s country of origin from its TLD alone. - Non-Latin domain names. DNS itself only understands ASCII characters, but browsers happily display domains in other scripts — a Russian site’s name might render as
сайт.рфin your address bar. Underneath, this is transparently translated into an ASCII-only form called punycode, prefixed withxn--(сайтbecomesxn--80aswg;.рфbecomes.xn--p1ai), which is what actually gets resolved. If you ever see a domain with anxn--prefix inrequestsoutput or inurlparse()’s result, that is what you are looking at: a non-Latin domain name in its underlying, DNS-legal encoding. Wikipedia’s overview of internationalized domain names covers the full encoding if you want more detail than this book does.
When you construct URLs for scraping or API calls, knowing which part of the domain identifies the service (the domain) versus which part routes you to a specific feature (the subdomain and path) helps you anticipate URL patterns. Government APIs often live at api.agency.gov, data portals at data.agency.gov, and documentation at developers.agency.gov. Recognizing these conventions saves you time when exploring new data sources.
5.6 HTTP: The Application Layer
HTTP (Hypertext Transfer Protocol) is the language that clients and servers use to communicate. A client sends a request with a method (GET, POST, PUT, DELETE), headers (metadata), and optionally a body. The server sends a response with a status code, headers, and a body.
The status codes you will encounter most often:
- 200 OK: The request succeeded and the response body contains the data
- 301/302 Redirect: The resource has moved; follow the
Locationheader - 403 Forbidden: The server understood your request but refused to fulfill it (often a User-Agent issue)
- 404 Not Found: The resource does not exist at this URL
- 429 Too Many Requests: You are being rate-limited; slow down
- 500 Internal Server Error: Something went wrong on the server side
This list covers what you will see most often in this book, not the full standard — see the MDN HTTP response status code reference for the complete set, including the less common ones you will eventually run into (401 Unauthorized, 405 Method Not Allowed, 503 Service Unavailable, and dozens more). You do not need to memorize it; bookmark it instead, and look codes up as you hit them.
Before you write a line of Python, the Network tab from earlier in this chapter already shows you every status code a page’s requests receive, in the Status column of the request list — reloading a page with the Network tab open and watching for anything other than 200 is often the fastest way to spot a problem before you ever open a notebook.
5.6.1 Diagnosing HTTP Errors
When a request fails, the status code tells you what went wrong, but diagnosing why requires looking at the full response. A diagnostic function can help:
import requests

def diagnose_request(url, headers=None):
    """Print diagnostic information about an HTTP request."""
    try:
        response = requests.get(url, headers=headers, timeout=10)
        print(f"URL: {url}")
        print(f"Status: {response.status_code}")
        print(f"Content-Type: {response.headers.get('Content-Type', 'not specified')}")
        print(f"Server: {response.headers.get('Server', 'not specified')}")
        print(f"Response size: {len(response.content):,} bytes")
        if response.history:
            print(f"Redirected from: {response.history[0].url}")
        return response
    except requests.exceptions.ConnectionError:
        print(f"Connection failed: {url}")
    except requests.exceptions.Timeout:
        print(f"Request timed out: {url}")

# Test on a few URLs; without a User-Agent that names you, Wikipedia answers both with 403
headers = {"User-Agent": "WebDataScience/1.0 (your-email@colorado.edu)"}
diagnose_request("https://en.wikipedia.org/wiki/Python_(programming_language)", headers=headers)
diagnose_request("https://en.wikipedia.org/wiki/Nonexistent_Page_12345", headers=headers)
The most common errors you will encounter in practice are 403 (Forbidden) and 429 (Too Many Requests). A 403 often means the server detected your request as automated — either because you are missing a User-Agent header or because the site blocks scraping entirely. A 429 means you are hitting the server too frequently. For 429 errors, a retry-with-backoff strategy helps:
import time

def get_with_backoff(url, headers=None, max_retries=3):
    """Retry a request with exponential backoff on 429 errors."""
    for attempt in range(max_retries):
        response = requests.get(url, headers=headers)
        if response.status_code == 429:
            retry_after = response.headers.get("Retry-After")
            if retry_after and retry_after.isdigit():
                wait_time = int(retry_after)  # the server told us how long to wait
            else:
                wait_time = 2 ** attempt  # 1s, 2s, 4s
            print(f"Rate limited. Waiting {wait_time}s before retry...")
            time.sleep(wait_time)
        else:
            return response
    return response  # Return the last response even if still 429
Exponential backoff doubles the wait time with each retry, giving the server progressively more breathing room. Many APIs include a Retry-After header in their 429 responses that tells you exactly how long to wait — the function above checks for it with response.headers.get("Retry-After") before falling back to its own backoff schedule.
Understanding status codes in context makes debugging much faster. A 403 from the Wikimedia API almost always means you forgot the User-Agent header — the fix is a single line of code. A 403 from a news site might mean the site blocks all automated access, and no header change will help. A 404 could mean the page was deleted, the URL has a typo, or the site restructured its paths. A 500 is the server’s problem, not yours — retry after a delay. Building this diagnostic intuition takes practice, but the pattern is always the same: check the status code, inspect the response headers, read the response body for error messages, and adjust your request accordingly. This systematic approach to debugging carries through every chapter that follows.
5.6.2 Making API Requests with Custom Headers
Let us retrieve data from the Wikimedia pageviews API. This API requires a meaningful User-Agent header — if you send the default requests User-Agent, you will get a 403 error:
import requests

article = "University_of_Colorado_Boulder"
api_url = (
    f"https://wikimedia.org/api/rest_v1/metrics/pageviews/per-article"
    f"/en.wikipedia/all-access/all-agents/{article}/daily/20260101/20260131"
)

# This will likely fail with a 403
response = requests.get(api_url)
print(response.status_code)  # 403

# Add a custom User-Agent header
headers = {"User-Agent": "WebDataScience/1.0 (your-email@colorado.edu)"}
response = requests.get(api_url, headers=headers)
print(response.status_code)  # 200

# Parse the JSON response
data = response.json()
From the terminal. The same check, inspectable without Python: curl -I fetches only the response headers — a fast way to confirm a status code without downloading the body — and curl -v shows the entire request and response, close to what the Network tab’s Headers pane showed you earlier in this chapter. Both work alongside -A to set a User-Agent the same way the headers dictionary above does. See “curl and wget” later in this chapter for these tools as full alternatives to requests.
Now convert the response to a DataFrame and plot it:
import pandas as pd
import matplotlib.pyplot as plt

# The pageview data is nested inside data['items']
df = pd.DataFrame(data["items"])
df["timestamp"] = pd.to_datetime(df["timestamp"], format="%Y%m%d00")

plt.figure(figsize=(10, 4))
plt.plot(df["timestamp"], df["views"])
plt.title(f"Daily Pageviews: {article}")
plt.xlabel("Date")
plt.ylabel("Views")
plt.tight_layout()
plt.show()
5.6.3 User-Agent Spoofing
Every request this chapter has made has honestly identified itself — WebDataScience/1.0 (your-email@colorado.edu), a real contact address a server operator could actually use to reach you. User-Agent spoofing means sending a User-Agent header that claims to be something you are not: a specific browser, operating system, or device you are not actually running. It is worth understanding both because you will encounter it — some sites behave differently depending on what you claim to be — and because doing it yourself raises questions this book has otherwise been able to sidestep by simply identifying itself truthfully.
There are legitimate, unremarkable reasons to change a User-Agent: testing how your own site renders on a phone without owning one, checking whether a page serves a simplified version to older browsers, or working around a service that blocks a legitimate research tool’s honest identification for no defensible reason. There are also reasons that are not legitimate, covered below.
Mechanically, spoofing is nothing more than the headers dictionary you already know how to build — just with a value that describes a browser and device you are not actually using:
import requests

# An honest identification, like every other request in this book
honest_headers = {"User-Agent": "WebDataScience/1.0 (your-email@colorado.edu)"}

# A spoofed identification, claiming to be a specific desktop Chrome browser
spoofed_headers = {
    "User-Agent": (
        "Mozilla/5.0 (Windows NT 10.0; Win64; x64) AppleWebKit/537.36 "
        "(KHTML, like Gecko) Chrome/128.0.0.0 Safari/537.36"
    )
}

# httpbin.org's /user-agent endpoint just echoes back whatever header you sent --
# a safe, verifiable way to see exactly what a server receives, with no guessing
# about how any particular real site might currently react to it
print(requests.get("https://httpbin.org/user-agent", headers=honest_headers).json())
print(requests.get("https://httpbin.org/user-agent", headers=spoofed_headers).json())
The two responses differ only in the string you supplied — the server has no way to tell the second one apart from a real Chrome browser unless it looks at more than the User-Agent header alone (more on that below). You already saw a real, working case of a site’s behavior actually changing based on this exact header earlier in this chapter: the Wikimedia pageviews API’s default requests User-Agent got a 403, and a properly identified one got a 200. That is UA-based gatekeeping in its lightest, most common form — refusing an unidentified client — and it is already something you have done deliberately, just not by pretending to be a different, specific piece of software.
What a User-Agent string actually contains. The long, oddly-formatted string above packs in a browser’s rendering engine, version, and operating system, largely for historical compatibility reasons rather than any coherent modern design — that is why even a current Chrome browser’s User-Agent still contains the word “Mozilla.” Because parsing these strings reliably is genuinely difficult, modern browsers increasingly expose the same information in a cleaner, structured way through User-Agent Client Hints — a newer set of headers (Sec-CH-UA and related) that a server can request explicitly instead of parsing a free-text string. A server that checks the traditional User-Agent header while ignoring Client Hints, or the reverse, can end up seeing a mismatch between what the two report — one of several signals, beyond the User-Agent header alone, that modern bot-detection systems use. The practical takeaway for this book is narrower than “how to avoid detection”: simply changing a User-Agent string is a weak, easily-noticed technique on its own, not a reliable way to make automated traffic indistinguishable from a real browser, and treating it as one will give you false confidence.
Spoofing a User-Agent is not illegal simply as a technical act — what matters is what you do it for. Checking how your own site renders on different devices is unremarkable; defeating a site’s stated attempt to block automated access is a different act with real legal stakes, even though the code is identical either way. Chapter 2 covers those stakes in depth — the same analysis that applies to robots.txt and Terms of Service applies here.
For coursework in this class, the rule is the one Chapter 2 already establishes for everything else: identify yourself honestly by default, and treat a site’s explicit attempt to block automated access as a signal to stop and reconsider, not an obstacle to route around. If a legitimate research need ever leads you to consider doing otherwise, that is a conversation to have with your instructor first.
5.6.4 Connections, Sessions, and Retries
Every bare requests.get() call does more work than it appears to: it opens a fresh TCP connection to the server, performs the TLS handshake, sends the request, and tears the connection back down. For a single request, that overhead is negligible. But the chapters ahead will have you making dozens or hundreds of requests to the same host — one per Wikipedia article, one per bill, one per archived page — and paying the connection setup cost every time is wasteful for both you and the server.
A requests.Session object fixes this. A Session keeps the underlying connection open and reuses it for subsequent requests to the same host, and it remembers headers, so you set your User-Agent once instead of passing it to every call. A Session can also carry a retry policy: rather than hand-rolling backoff logic like the get_with_backoff() function you wrote earlier, you can mount a Retry configuration that automatically retries rate limits and transient server errors with exponentially increasing delays — and it honors any Retry-After header the server sends:
import requests
from requests.adapters import HTTPAdapter
from urllib3.util.retry import Retry

# Create a session with persistent headers
session = requests.Session()
session.headers.update(
    {"User-Agent": "WebDataScience/1.0 (your-email@colorado.edu)"}
)

# Retry up to 3 times on rate limits and server errors, waiting 1s, 2s, then 4s between attempts
retries = Retry(
    total=3,
    backoff_factor=1,
    status_forcelist=[429, 500, 502, 503, 504],
)
session.mount("https://", HTTPAdapter(max_retries=retries))

# Use the session exactly like the requests module itself
articles = ["Python_(programming_language)", "Web_scraping", "Data_science"]
for article in articles:
    url = f"https://en.wikipedia.org/wiki/{article}"
    response = session.get(url)  # Connection reused; headers already set
    print(article, response.status_code, len(response.text))
# Python_(programming_language) 200 812394
# Web_scraping 200 145207
# Data_science 200 291846
The setup costs six lines, and everything after that behaves exactly like the requests.get() calls you already know — session.get() returns the same Response object with the same .json(), .text, and .status_code.
A for loop around requests.get() is your cue to create a Session first. The scraping and API chapters ahead (Chapter 6, Chapter 10, Chapter 11) all involve exactly this kind of loop over many URLs at the same host, and this pattern carries over unchanged.
5.6.5 curl and wget: Command-Line Alternatives to requests
Everything this chapter has done with requests has a command-line equivalent. curl and wget are HTTP clients too — just ones you drive from the terminal instead of Python, and they are worth knowing for exactly the situations where opening a notebook is more overhead than the task deserves: a one-off check, a shell script, a scheduled job on a server that may not even have Python installed, or simply downloading a file straight to disk without writing code to do it.
The two tools split the same job differently. curl is a general-purpose HTTP client built for fine control — headers, methods, authentication — and prints the response to your terminal by default. wget is built specifically for downloading: it saves to disk automatically, resumes interrupted downloads, and, as you will see below, has built-in support for exactly the kind of polite, rate-limited fetching this book has been teaching you to write by hand in Python. curl ships by default on macOS, Linux, and modern Windows; wget is standard on most Linux distributions but often needs a separate install on macOS (brew install wget).
Neither tool replaces Python for this book’s actual work. They fetch; they do not parse. The moment you need to pull a value out of JSON, select an element out of HTML, or turn a response into a DataFrame, you are back to requests and the rest of this book. curl and wget are for everything before that: getting the bytes.
Setting a User-Agent. The same header, the same reasons, from the command line instead of a headers dictionary:
curl -A "WebDataScience/1.0 (your-email@colorado.edu)" https://en.wikipedia.org/wiki/Web_scraping
wget --user-agent="WebDataScience/1.0 (your-email@colorado.edu)" https://en.wikipedia.org/wiki/Web_scraping
curl prints the response body to your terminal by default — add -O to save it to a file named after the URL’s last path segment, or -o filename.html to choose the name yourself. wget saves to disk automatically, without being asked.
Replicating time.sleep() between requests. This is where the two tools genuinely differ, not just in syntax. wget has rate-limiting built in: --wait=SECONDS pauses between each request when you give it more than one URL, and --random-wait varies that pause between roughly half and one-and-a-half times the value you gave, so your request timing does not look as suspiciously uniform as a fixed delay does:
wget --wait=2 --random-wait https://en.wikipedia.org/wiki/Python_(programming_language) https://en.wikipedia.org/wiki/Web_scrapingcurl has no equivalent flag — you get the same behavior only by wrapping it in a shell loop and calling sleep yourself, the command-line version of the time.sleep() calls you have already written in Python:
for url in "https://en.wikipedia.org/wiki/Python_(programming_language)" "https://en.wikipedia.org/wiki/Web_scraping"; do
  curl -O "$url"
  sleep 2
done
Fetching several files from a server. The Session loop just above fetched three Wikipedia articles from Python:
The same task from the command line reads a list of URLs from a file, one per line, instead of looping over a Python list — with wget’s rate-limiting doing the polite pause for you:
cat > articles.txt << 'EOF'
https://en.wikipedia.org/wiki/Python_(programming_language)
https://en.wikipedia.org/wiki/Web_scraping
https://en.wikipedia.org/wiki/Data_science
EOF

wget -i articles.txt --wait=2 --random-wait --user-agent="WebDataScience/1.0 (your-email@colorado.edu)"
Every file lands in your current directory, named after its own URL. This pattern — a text file of URLs, one wget call, a --wait you set once — is often the fastest way to grab a known, fixed set of files (an agency’s list of CSV exports, a set of PDF filings) without writing a line of Python at all. If you later need to do something with what you downloaded beyond saving it to disk, that is your cue to switch back to requests and the rest of this book.
5.7 URLs: Anatomy and Parsing
URLs (Uniform Resource Locators) have a well-defined structure:
scheme://userinfo@host:port/path?query#fragmentNever write regular expressions to parse URLs. Use the urllib.parse module instead:
from urllib.parse import urlparse, parse_qs

url = "https://api.census.gov/data/2022/acs/acs5?get=NAME,B01001_001E&for=place:07850&in=state:08"

parsed = urlparse(url)
print(f"Scheme: {parsed.scheme}")      # https
print(f"Host: {parsed.netloc}")        # api.census.gov
print(f"Path: {parsed.path}")          # /data/2022/acs/acs5
print(f"Query: {parsed.query}")        # get=NAME,...

# Parse query parameters into a dictionary
params = parse_qs(parsed.query)
print(params)
# {'get': ['NAME,B01001_001E'], 'for': ['place:07850'], 'in': ['state:08']}
Understanding URL structure is essential for constructing API requests. In Chapter 10 through Chapter 13, you will build URLs programmatically by assembling scheme, host, path, and query parameters.
5.7.1 Building URLs Programmatically
Web APIs expect the values you supply in one of two places, and you need to recognize which pattern you are dealing with before you can build the URL correctly.
Both patterns below build URLs with Python’s f-strings — a compact way to embed variables and expressions directly inside a string, written f"...{expression}...". This is an intermediate Python feature: an f-string evaluates whatever sits inside the curly braces and inserts the result directly into the string at that position.
name = "Boulder"
count = 3

# An f-string: the "f" before the opening quote enables {expression} substitution
print(f"{name} has {count} things")          # Boulder has 3 things
print(f"{name} has {count + 1} things")      # expressions work too, not just variables
print(f"{name.upper()} has {count} things")  # so do method calls

# An ordinary string does none of this -- braces stay literal text
print("{name} has {count} things")           # {name} has {count} things
An f-string can also span multiple lines by placing several adjacent string literals next to each other — Python concatenates them automatically, which is how the URL-building code below builds one long string across several lines without a single +. The Python tutorial’s section on formatted string literals covers the full syntax, including format specifiers ({value:.2f} for two decimal places, and similar) that come up less often in this book but are worth knowing exist.
Path-segment APIs embed each value at a fixed position in the URL’s path. The Wikimedia pageviews endpoint you used earlier works this way: project, access method, agent, article, granularity, and date range are all path segments in a required order. Build these URLs with an f-string over the components — but URL-encode any component that might contain special characters using urllib.parse.quote, because a stray slash or space inside a path segment produces a URL the server cannot route:
from urllib.parse import quote

# Each value occupies a fixed position in the path
project = "en.wikipedia"
access = "all-access"
agent = "all-agents"
article = "University of Colorado Boulder"  # Note the spaces

# Wikipedia titles replace spaces with underscores; quote() percent-encodes anything else that would break a path segment (slashes, question marks)
encoded_article = quote(article.replace(" ", "_"), safe="")
print(encoded_article)
# University_of_Colorado_Boulder

url = (
    "https://wikimedia.org/api/rest_v1/metrics/pageviews/per-article"
    f"/{project}/{access}/{agent}/{encoded_article}/daily/20260101/20260131"
)
print(url)
# https://wikimedia.org/api/rest_v1/metrics/pageviews/per-article/en.wikipedia/all-access/all-agents/University_of_Colorado_Boulder/daily/20260101/20260131
The encoding matters more than this example suggests: a band like “AC/DC” has a slash in its article title, and quote("AC/DC", safe="") correctly produces AC%2FDC. Paste the raw title into your f-string instead, and the API would interpret the slash as a path separator and return a 404.
Query-parameter APIs instead accept key=value pairs after a ?, where order does not matter and many parameters are optional. The MediaWiki Action API — Wikipedia’s general-purpose API, which you will explore in Chapter 10 — works this way. The urlencode function converts a dictionary into a properly escaped query string:
from urllib.parse import urlencode

base_url = "https://en.wikipedia.org/w/api.php"
params = {
    "action": "query",
    "format": "json",
    "titles": "University of Colorado Boulder",
    "prop": "info",
}

query_string = urlencode(params)
print(query_string)
# action=query&format=json&titles=University+of+Colorado+Boulder&prop=info
For query-parameter APIs, the requests library can do this encoding for you: pass the dictionary as the params argument. This is the preferred approach for API calls:
How do you know which pattern an API expects? Read its documentation — but the URL itself usually tells you. Values between slashes are path segments: build the URL with an f-string and quote() each component. Values after a ? are query parameters: pass a dictionary via params= and let requests handle the escaping. REST-style endpoints that return one specific resource (like pageviews for one article) tend to use path segments; APIs with many optional settings (like the Action API’s dozens of parameters) tend to use query strings. Mixing them up is a classic source of confusing 404s — query-encoding values that an API expects in its path sends the server a URL it cannot route. You will appreciate this distinction especially in Chapter 10 and Chapter 11, where article titles and variable names frequently contain characters that require encoding.
5.8 Recommended Exercises
This guided exercise is the chapter’s take-home assignment. Work through it in the companion notebook, filling in each empty code cell, and submit the completed notebook. The steps build on one another, so do them in order — everything you need appears in this chapter or an earlier one.
You will build a URL diagnostic tool from the protocol layers this chapter covered — DNS, HTTP status codes, headers, and redirects — and use it to profile five real URLs.
Step 1 — Take a URL apart. Use urlparse() on three URLs of different shapes — a plain page, a URL with a query string, and one of the API URLs from earlier chapters. For each, print the scheme, netloc, path, and query.
Step 2 — Resolve a name. Use dns.resolver to look up the A records for en.wikipedia.org and two other domains you choose. Print the IP addresses. Do any share an address?
Step 3 — Request with named headers. Define your HEADERS (Chapter 2) and request one of the three URLs from Step 1. Print the status code and three response headers: Content-Type, Server, and Content-Length (or the length of response.content if the header is absent).
Step 4 — Write diagnose_url(). Wrap Step 3 in a function diagnose_url(url) that prints the status code, Content-Type, Server header, response size in bytes, and whether the request was redirected — check response.history, and if it redirected, print where it ended up. Include a docstring.
Step 5 — Profile five URLs. Run diagnose_url() on five URLs chosen to behave differently: a working page, a page that 404s, a URL that redirects (try an http:// address of a site that upgrades you to https://), an API endpoint, and a site known to restrict automated access (Chapter 3 showed you one).
Record what you actually receive from the fifth site: its behavior can vary with your network, request headers, and the time of the request. Inspect a short excerpt of response.text as well as the status and headers. A 200 response or a small HTML body alone does not tell you whether you received the requested content, a page that needs JavaScript, or an access challenge. If the response does not clearly show a refusal, report that you could not confirm a block; you do not need to keep trying sites until one refuses you.
Step 6 — Interpret. In four to six sentences: What distinguished the API endpoint from the web pages in Content-Type and size? Where did the redirect send you, and why do sites do that? For the fifth site, what evidence supports a refusal, successful access, or an uncertain result? If you observed a refusal, explain what you can infer about the layer involved (Chapter 3). An HTTP response shows that you reached an HTTP-speaking server, but its status alone does not identify whether the response came from the site’s application, a CDN, or a proxy; a connection error or timeout provides no HTTP status to interpret.
5.9 Additional Exercises
These are open-ended extensions — no scaffold, no fixed path. Use them for further practice or deeper exploration.
Browser developer tools. Open a Wikipedia article and a commercial news site side by side, each with the Network tab open. Reload both pages and compare: how many requests does each make? What types of resources (HTML, CSS, JS, images, fonts, tracking) does each load? What does this tell you about modern web architecture?
DNS exploration. Use
dns.resolverto look up the IP addresses for five related domains (e.g.,google.com,youtube.com,gmail.com,drive.google.com,cloud.google.com). Are any of them hosted at the same IP address? What does this tell you about Google’s infrastructure?Wikimedia pageviews. Using the API pattern from this chapter, retrieve and plot daily pageview data for three related Wikipedia articles over the same time period. Identify any spikes and hypothesize about what real-world events caused them.
Network tab analysis. Pick a website you visit frequently. Reload it with the browser’s Network tab open and recording. Count and categorize all requests into types: HTML documents, CSS stylesheets, JavaScript files, images, fonts, and tracking/analytics scripts. What fraction of requests serve actual content vs. tracking and advertising? Write a brief analysis of what this reveals about the site’s business model.
Graduate extension (INFO 5617). Choose a website you might plausibly study in your own research and profile its delivery infrastructure. Use the browser’s Network tab to record the time to first byte, the full redirect chain, and evidence of CDN involvement (inspect the
Server,Via, and similar response headers), then run traceroute to the same host from your notebook (!traceroute, or!tracerton Windows) and geolocate a few of the hops. Write a 500-word memo connecting these protocol-level observations to research-infrastructure concerns: where does “the” site actually live, how stable are measurements of it likely to be across time and vantage points, and what would an automated collection pipeline need to handle — redirects, rate limits, geographically varying responses — to gather data from it reliably?
5.11 Common Issues to Debug
!pingor!traceroutedoesn’t stop: Without-c,pingon macOS and Linux runs until it is stopped. Press the notebook’s ■ (interrupt) button, and add-c 4.'traceroute' is not recognized(Windows) ortracert: command not found(macOS, Linux): The two systems name the tool differently. The chapter’s cells choose withplatform.system(). On Linux withouttraceroute, usetracepath.- Every hop is
* * *: Many networks, campus Wi-Fi included, block the probes traceroute sends. Try another network, such as a phone hotspot. The path past the silent hops usually exists; it just isn’t shown. wget --random-waithas no visible effect: It only randomizes a wait time you already set with--wait; used alone, with no base wait to randomize, it does nothing.- 403 from Wikimedia API: You forgot the custom
User-Agentheader. - DNS results varying by location: Normal — content delivery networks return different IPs based on your geographic location.
dns.resolverraisesNoNameservers ... answered REFUSED: The kernel is querying campus resolvers (CU’s are in the128.138.x.xrange), which only answer recursive queries from on-campus addresses.dnspythonreads DNS settings once per process, so a kernel started on campus or on VPN keeps them after you get home, even thoughscutil --dnsshows your current ones.requestsand your browser keep working, which makes it look specific to this exercise. Restart the kernel; if that doesn’t fix it, build your own resolver withr = dns.resolver.Resolver(), setr.nameservers = ["8.8.8.8", "1.1.1.1"], and callr.resolve(...)instead ofdns.resolver.resolve(...).- URL encoding issues: Use
urllib.parse.quote()for article titles with spaces or special characters.
5.12 Key Takeaways
The web is built on a layered stack of protocols: TCP/IP transports data, DNS resolves names to addresses, HTTP structures the conversation, and URLs identify the target. Traceroute and curl’s verbose output make that transport layer directly observable, and the User-Agent header — honest or deliberately spoofed — is how a server decides who, or what, it believes is asking. Understanding this stack transforms debugging from guesswork into systematic diagnosis. When a request fails, you can ask: can I reach the server at all? Am I resolving the right address? What status code did I get? Are my headers correct? Is my URL well-formed? This systematic approach carries through every chapter that follows.
5.13 Further Reading
- Mozilla Developer Network — How the Web Works: https://developer.mozilla.org/en-US/docs/Learn/Getting_started_with_the_web/How_the_Web_works
- Mozilla Developer Network — HTTP Overview: https://developer.mozilla.org/en-US/docs/Web/HTTP/Overview
- IPython’s shell commands,
!andvar = !command: https://ipython.readthedocs.io/en/stable/interactive/python-ipython-diff.html#shell-assignment - Wireshark, the standard GUI packet analyzer: https://www.wireshark.org/
dnspythondocumentation: https://dnspython.readthedocs.io/- Wikipedia — Internationalized domain name: https://en.wikipedia.org/wiki/Internationalized_domain_name
- Mozilla Developer Network — HTTP Client Hints: https://developer.mozilla.org/en-US/docs/Web/HTTP/Guides/Client_hints
curlmanual: https://curl.se/docs/manpage.html- GNU
wgetmanual: https://www.gnu.org/software/wget/manual/wget.html
5.10 Social History and Public Interest
The protocols described in this chapter were designed as public infrastructure. Vint Cerf and Bob Kahn developed TCP/IP in the 1970s for DARPA, creating a transport layer engineered for resilience under attack. Tim Berners-Lee invented HTTP and URLs at CERN in 1989–1991, and made the deliberate decision to release them into the public domain. The web was born open.
Browser developer tools embody this original spirit of openness. The ability to “view source” — to inspect exactly what a web server sends your browser — was a foundational feature of the web. It is what makes web data science possible. As you will see in Chapter 3, the tension between this transparency and platforms’ desire to control their data is one of the defining conflicts of the contemporary web.
This same tension extends past the browser. Packet sniffing and traceroute make the network’s actual behavior directly observable — an open, inspectable internet was the original design, not an accident. But the same capability cuts both ways: watching your own traffic is transparency, and watching someone else’s without consent is surveillance — the difference is not the tool, but who is doing the observing. User-Agent spoofing sits on the identity side of the same tension. The protocols in this chapter run on an honor system, where a client simply states who it is, and spoofing tests that trust the same way platforms’ own obfuscation tests the openness Chapter 3 describes.
The web’s protocol stack was designed as public infrastructure — open standards documented in public RFCs, not proprietary products controlled by corporations. HTTP, HTML, DNS, and TCP/IP are all open protocols that anyone can implement. The “view source” capability and network inspection tools you learned in this chapter are features that embody openness (Chapter 3). They exist because the web’s architects believed that transparency was a feature, not a vulnerability. As platforms increasingly obfuscate their front-end code and move toward closed APIs, these tools become more important, not less.